Showing posts with label materials. Show all posts

Saturday, August 24, 2019

Holy Bible Assembly

Paint the side with no names written on
Apply binding (gold duct tape in this pic)
to opposite side from where the name is penciled in
Paint/write the names on appropriately
Paint the backside (where the name was penciled in)
Paint/write the names on appropriately
Paint the backside (where the name was penciled in)


Placement of the pieces for the box itself

How the lid fits onto the box

Lid on the box; decorate as you like

Thursday, November 5, 2015

Prophet Studies in Level 3

In the last several weeks, our lives have taken some pretty major turns. For the better? Only God and time will tell.

In lieu of being in a consistent atrium each week, I have been subbing in a variety of locations - which is awesome because of the variety of ideas and the freshness of sharing atrium experiences with different children ---- and not so awesome in that I am still recovering from an early bout of the flu 2 months ago, picked up from a new germ pool at a new atrium. While I have been able to fight off everything else, the cough just goes on and on and on and on. So I will be pulling back from subbing, just in time for all the teachers to get sick and need subs more often. Sorry! I need to heal up!

This all means I have spent a solid 36 hours in bed (I am *never* that sick!), our classroom is only half ready (read: MESS), Garden of Francis orders are no longer "caught up", Keys of the Universe videos have not been finished, and Legoboy has not participated in all the things he was going to do, simply because I no longer can get him there. So my hope for this year was to streamline both businesses to spend less time on them, spend less time with my son (we homeschool, he's 11, he needs some time away from me ;) ), and not require 50 hours in a day. Now I am spending *more* time on the atrium and the same amount of time elsewhere.

At least Legoboy's schooling is moving forward. And he remains healthy. Healthy enough to get braces! Hehe.

~~~~~~~~~~~~~~

The whole experience, and the events that led to the changes, have put me in the mind of the prophets. Most of them were persecuted in their own homes, shunned by the very people God led them to speak to, tortured emotionally and physically, yet most of them trusted God in all moments (ahem, Jonah!) and they all, using a word from the final prophetic book of the Bible, Revelation or the Apocalypse, *overcame.*

With God's grace, they were Overcomers.

All of us who are persecuted can be an Overcomer.
There are so many lessons to be learned from the Prophets. 
Each of us are called to be a prophet. Always.  

~~~~~~~~~~~~~~~~~~~~~~~

Within the atrium, our official studies consist of the following:

Level 1:

  • 5 messianic prophecies during Advent
Level 2: 


  • 8 messianic prophecies (same 5, plus 3 additional), looking towards the moral prophetic message in some of them
  • We also look to the Books of the Bible and many atriums have a set of command cards guiding them through those books, which have some questions on the Prophetic books section
Level 3: 
  • Tying in the moral and messianic and looking to the future, Parousia
  • Study on the Call/Vocation of the Prophets
  • Study on the Content (Moral/Messianic) of the Prophets
  • Study on the Struggles of the Prophets
  • We also look to a set of prophecies related to the Parousia, matching the passage with its title and discussing what it might mean: The Holy Bible & Parousia

Personal Experience: 

In the level 3 atriums I have been in?

We began here: 
2012 Seeking the Plan of God post on Prophet Studies


Over time, we found our groove.

At level 3, our Prophecy Binder has veered a bit from the official CGS material, based on feedback and requests from the children themselves. I will not reproduce the CGS material here, but anything I have that is not found in the CGS materials is available for download at Garden of Francis.
Update with a note: The older CGS prophet study included a great deal more than it does now. Now (as of 2011-2015+) we almost solely focus on Isaiah with a tiny bit of looking at the call of 3 other prophets. The chidren were not satisfied with this to say the least, so I pulled out the older materials and adapted them a bit. The details follow.

The Binder Cover
I used a 2 inch D-ring (I would not use anything NOT a D-ring!)

Inside the front pocket:
Map of the Middle East during the time of the Prophets
Prophets Scripture Chart (several copies - each student takes one)
Before the Sun Burned Bright song - some children like to learn it

Instruction page (first page in the binder - in a sheet protector)

Added a set of cards to guide the children through studying a prophet or prophecy.
These are based on the old prophet study.
Some children created additional ones for each other and for themselves
- I encourage the older children to find ways to extend the work.
Stored in a pouch. 

Scripture chart - with a letter to the left side of each set,
corresponding with a booklet.
This may be based on the old material; it is modified for clarity. 

Each booklet in its own lettered pouch.
Book 'a' comes first; the others can be any order.
CGS used to use the books; then said use for catechist study only.
My atrium children have all gained a LOT from them!
But we needed modifications to aid in personalizing the experience. 

Last year, we made multiple copies of the first book,
since all the children need to read it each year.
And we had a HUGE class. Too large. 

What follows are the modifications I made to each booklet - 
notes to guide the children's follow-up work. 
(these should be pictured in order from book a to book e)
The children are always invited to artistic response: art, writing, creation of a project, etc.


We also have this really cool poster:

It shows the kings aligned with the prophets,
through 3 time periods in Israel.
VERY cool. 

NOT PHOTOGRAPHED:
  • One atrium has a beautiful wooden treasure box that holds index cards. A set of blank index cards is next to the box. As the children find a prophecy (anywhere in the Bible - prophetic books, Revelation, New Testament, etc.), they are to write the Scripture citation and a quick summary (if the passage is longer) on one side. On the other side, they can write a title for the prophecy. This work was inspired by a combination of our updated/older-fied Prophet study and the Holy Bible & Parousia material. A child put it together. 


It is always good to have additional reading materials on hand. This particular book is very nice!


A sample page - beautiful illustrations, good information!
The style connects the children to the art heritage of our faith. 


Saturday, October 26, 2013

New 2000 Years Timeline - and Memorial images


Going back to an April post on the images for the 2000 Years and the Memorial:

I have created my own 2000 Years timeline and have edited the images for the Memorial to be put together this coming week. They are SO beautiful!

For the 1900s, I am adding a photo of local parishioners; I have left a blank space for the 21st century, not just for the blank page, but so that each year we will have a photo of the current atrium children - to show that they are writers of the blank page right now, and that they are part of this timeline. I think it will more smoothly lead into their work on "My Century".


The images turned out so fantastic! Just a few things to hand-write on, to keep that personal touch.

I removed the binding from the book from which I obtained these images and placed the pages into sheet protectors in a binder, affixing the cover of the book to the cover of the binder. This binder can be used for the children's reference if they want to look at weapons, vehicles, tools, furniture and other artifacts of the people at various times in history.


An extension of this work that the children suggested to me - after the initial presentation, the children use blank index cards to write the name of a person (a saint, a famous person, someone in their ancestry) on the front of the card and the date of their life on the back. They can then place those cards in the appropriate sections of the timeline, utilizing the cards created by others as well - see if they can remember when certain people lived (flip the card over to check the date). The hope is that this work will also lead into saint studies; and the child-suggested extension seems to be moving in just that direction! I previously found the timeline too vague to connect with saint history - it's there, just fuzzy ;) But, follow the child, and see what we discover about the richness of our Faith: the beauty, the Truth, the holiness that comes with God's Light.


Sunday, April 7, 2013

Images for 2000 Years and The Memorial

I have always been dissatisfied with the people images suggested or provided for these two materials. They are fuzzy to print out; too much color background on some.... I made our 2000 Years timeline with the black and white printouts and have s-l-o-w-l-y been hand-coloring them over the course of the school year. s--l--o--w--l--y... it's so tedious.

We are ready for the Memorial - I got the rest of the materials ready to go, with one card copy/pasted wrong. Oops. I'll just hand-write the correction on orange paper and tape it on with packing tape for now. Let's wait to re-print the whole page of cards for that one little one (4 fit per page on this section), until I find any other typos ;)   But I didn't have the people ready - the ones provided don't even line up right!

And then I found this:


The images are JUST perfect! Most pages have nice little rows of people from a particular time period (labeled); not much text... I bought two - one to cut up for the timeline and Memorial... and one for the children to use in their personal research.

(and I have realized that I have many-many-many draft posts. Oops. That time thing ;) ).


Saturday, November 17, 2012

City of Jerusalem - First and Only Making


The City of Jerusalem work is a favorite of the children. They can manipulate the walls of the city, locate all the places of Jesus' last days, touch the tomb and the cenacle and the garden - and begin to get a sense for where everything is and how it fits together. Children as young as 4 receive presentations on this material and children as young as 3 are fascinated with just LOOKING at the material!

Even adults work with it and say, "I get it!" The older children (level 2 and level 3) and the adult wants to re-create Jesus' last days and hours, but also want to re-create what happened at the Presentation in the Temple, the finding of the Child Jesus and other accounts that happened in Jerusalem. So frequently, a child reading a Scripture passage related to Jerusalem will want to go sit next to the material while reading, even if all the action takes place in one location.


The first time I wanted to present this work to my first atrium children, I ran short of time that week. partly because I was having serious issues getting the computer file right - I started with a photograph of a poster of the City of Jerusalem, turned it black and white and literally erased everything I didn't want. But it wasn't printing out right. Asked a friend for help on settings and finally got it - printed it out on multiple pieces of paper, cut out the sides of a large box (either from a child safety seat box or the box for the pack-and-play I didn't want - or something like that), and affixed the paper pages to it. Traced my son's blocks to use as walls. Added some coloring and voila:

We no longer have the blocks so I need to replace the walls.
Still have the charts though!
As simple as it comes; thrown together;
just need to white out the mistake and retrace the walls
and it will be functional for another atrium.
Essentials. 


Any of you history buffs noticing a HUGE mistake I made on the original maps????

I still had the additional WALL that was added much later! So I have parts labeled wrong! Where I have that white tower in the upper right corner? That is supposed to be on the squarish looking thing on the "inner wall" - the Tower of Antonio. Argh! It took me 2 years to figure out what the issue was - by then I'd made all the Scripture booklets a few times over, with the incorrect map as a page. Then I got it fixed, but still had the old file - which popped back up when I moved to where I am now to set up atriums here.... So if you are IN one of those atriums and reading this - please check your Scripture booklets! I fixed what I had to access to at the time, but that leaves one more parish unchecked! Sorry! That file is now totally deleted! I have the file, am happy to share - or check the closet in the office - there should be extra replacements when I printed a BUNCH of them at once and laminated them ALL in preparation for replacements.


The tomb fell apart during my presentation. So it has been glued back together with wood glue. In preparation for use in the new atrium, everything is to be wrapped in a layer of plaster cloth. It is presently styrofoam or small cardboard pieces shaped and wrapped in Crayola Model Magic. The garden trees are plastic ferny-tree-like things from my son's animal scenery.

The crucifix is broken off a plastic broken rosary.

And the original candle holder was/is (I still HAVE IT!!!!) a square of cardboard wrapped in masking tape, with a birthday candle inserted and the tape wrapped around that, loosely. I then removed the candle and dipped in my son's sandbox sand (very fine) to make the tape not just too sticky anymore.


Who said the materials need to be fancy?

This is the ESSENTIALS!


;)


For the record, I have never made a City of Jerusalem since. I am routinely asked if I will make walls, but I haven't yet done it. Maybe because I know how basic and cheap it can be (the model magic was soon to dry up anyway - my daycare kids did NOT like to use it; paper and ink and tape were fresh - all else was found around the house or would have been garbage if I didn't use it here.


ESSENTIALS!


Friday, November 16, 2012

Liturgical Calendar


This post is not about the work of the child, but about the work of the catechist in preparing materials. One in particular.

I LOVE making materials. Making the materials is a meditation in itself and helps the adult to focus on what is the most essential. If you  make your own materials, you will find that you don't find the need to add little embellishments - because frankly, you don't have time, you've already put a lot of work into it and there is a main point to the work that is NOT going to be seen if you add that embellishment.

For example - I once thought, in my haughty adult mind that would impose itself on the children, that all of the international figures for the Eucharistic Presence of the Good Shepherd at level 2 should be clearly identifiable by country or region.

Um. NO.

See this recent response by the children in the atrium - look for their identification of the international figures:
The Good Shepherd will always find me


Yes, I make materials for sale, but I try to price them in such a way that the catechist is still encouraged to make them for him/herself. And I don't make them the same way a volunteer might.

My first chasubles had the edges folded over and stitched - they were not double folded, so the raw edge is still exposed. Most chasubles are made in such a fashion because it WORKS. Those first chasubles of mine are still present and used in a level 2 atrium (having been in 3 atrium spaces prior to that before being replaced by a local volunteer) - and are 8 years old. They are beautiful! All of this despite the fact I would never make them like that again! The ribbon I used down the front has metal wire in it and it holds it shape when bent. ;) But it WORKS for the children.

What more is needed? Yes I make them double-folded chasubles for customers; but they may or may not be Chinese-sweat-shop-perfect - in fact, I hope they're not! Because I am homeschooling my son, running two home businesses to get myself out of school debt and be home with my son, and working in various atriums. I am REAL. I WANT to provide a human touch! It was a person who made these materials - not a machine! Or a copier!


There is one material though - I don't know why I keep making it - the challenge I suppose!? I do not know why I continue to do so. Someone suggested it is because I have made all the mistakes that local woodcutters don't even think of.

The liturgical calendar. I'll be honest: I hate making them.

Here is my first liturgical calendar:

Christian Liturgical Calendar - PAINTED with unpainted available - domestic shipping included
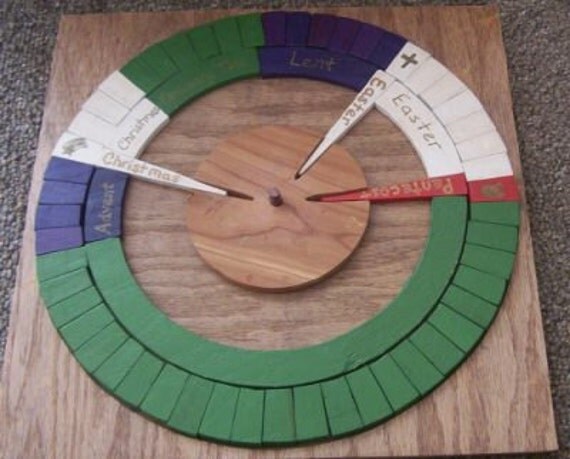
I swore I would never make one again.
At the time they could be purchased for $75. Just buy it next time I said!
The next time I needed one, the prices had gone up to $125+ for unpainted.
The prices have come down SOME since then. But not $75.
I designed this myself WITHOUT the materials manual - just photos
 of the calendar in my level 1 formation course. 
It has 52 Sundays - I only cut 52 Sundays. But I cut them. And I cut them. And I cut them. And I sanded them. And I cut them some more.

WHY!? Because once PAINTED, the paint and polyurethane (A THIN LAYER) adds half a millimeter of thickness to each side. There are 52 pieces. Multiplied by two sides comes to 52 mm which is 2 extra inches of space, which is the equivalent of two whole pieces.


So I started making them that way - cut 54 pieces - since it is hand-cut the pieces are slightly different widths anyway, so move the narrow ones to the shorter seasons, and the wider ones to ordinary time; paint around all but 2 and call it good.


Christian Liturgical Calendar - PAINTED with unpainted available - domestic shipping included


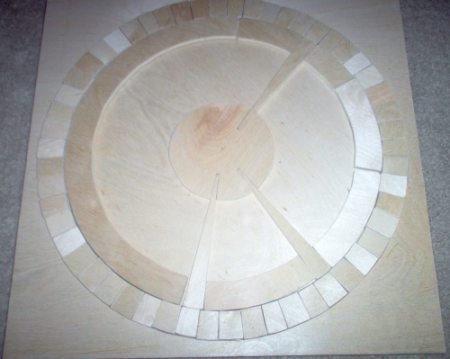
Then I started working on a different saw with different blades. I found that even with cutting 54 and leaving 2 out, I had to NOT paint on the sides to ensure everything fit.

Great! Fine! And I even starting making custom calendars for Godly Play and Young Children and Worship.

(are you starting to add up how many calendars I have had to spend HOURS fixing up so that they worked!? because of all the adjustments!?)

But I finally got it working for several months.


Trouble is - then I switched to using different blades again (not my fault - it's a source thing) - that take out a bit more wood. So even painting the sides of the 52 pieces didn't quite fill it in - it's "ok" but not good enough for "customers". So I set those calendars aside and was able to locate the other blades again. Re-create those particular 3 calendars for customers.

Trouble again is - one of the set-asides was accidentally sent to a customer without the sides painted at all - and now she is accusing me of telling her to paint "thick" layers of paint on the sides (I never said that - I said thin layer), she doesn't believe me that any layer of paint will indeed add up quickly to achieve thickness, she refuses to believe that cutting 54 pieces is necessary to assure proper fit in the final product, among other lack of understanding any explanations given, refunds offered, etc. She has done everything except call into question my Montessori training and my CGS formation (and recognition as a formation leader myself) - perhaps she doesn't know I have those formations. So on the one hand, I am not "offended"; on the other hand, it was an honest mistake on my part, as well as a very real aspect of making such a detailed material. I am making her a replacement (still with 54 pieces) and will use the one she sends back to me in an atrium I know of that WANTS a bit more wiggle room of the pieces because of special needs children.


So here is another scenario - a local wood-cutter made a liturgical calendar for the local level 2 atrium. It is beautiful! As is everything this particular family makes!

But it didn't work.

Why!? Because he cut 52 pieces, his wife painted them, and by the time they were brought to the atrium, one piece didn't fit in AT ALL and a second piece would only go in sideways. So there are 50 functional pieces, with one on its side! I do not blame the wood-cutter - he'd never made such a product and the CRE who commissioned the project probably didn't give him the tips that were provided me in my level 1 formation (and I still made mistakes!!!), nor did she have any experience making such a material to KNOW that there are little issues like this.

So the catechist asked me to fix it - so that no feelings would be hurt anywhere. I quietly measured out the pieces, took the widest ones with me and trimmed them down on my own saw. I brought them back and found they just barely fit (but I'd not yet repainted!), so I took them back and trimmed them down again. They now fit - but it's a year later and we've not been brave enough to re-paint the cut off sections. Problem is: holding those little pieces up to that blade that is WANTING to take off my fingers. I don't want to have to do it again if I paint those sides and find it is too thick again!

Nope. I am sticking to 54 pieces and painting them on all sides. I like my finger tips ;)


UPDATED 2019:
I no longer make them with 54 pieces as I now have a laser cutter to make them just perfect for us!

And I have been making nice deep prisms for several years. So much nicer for the children's fingers.